bunnycdn wordpress
Updated March 2026 14 min read RemarkableCloud Team

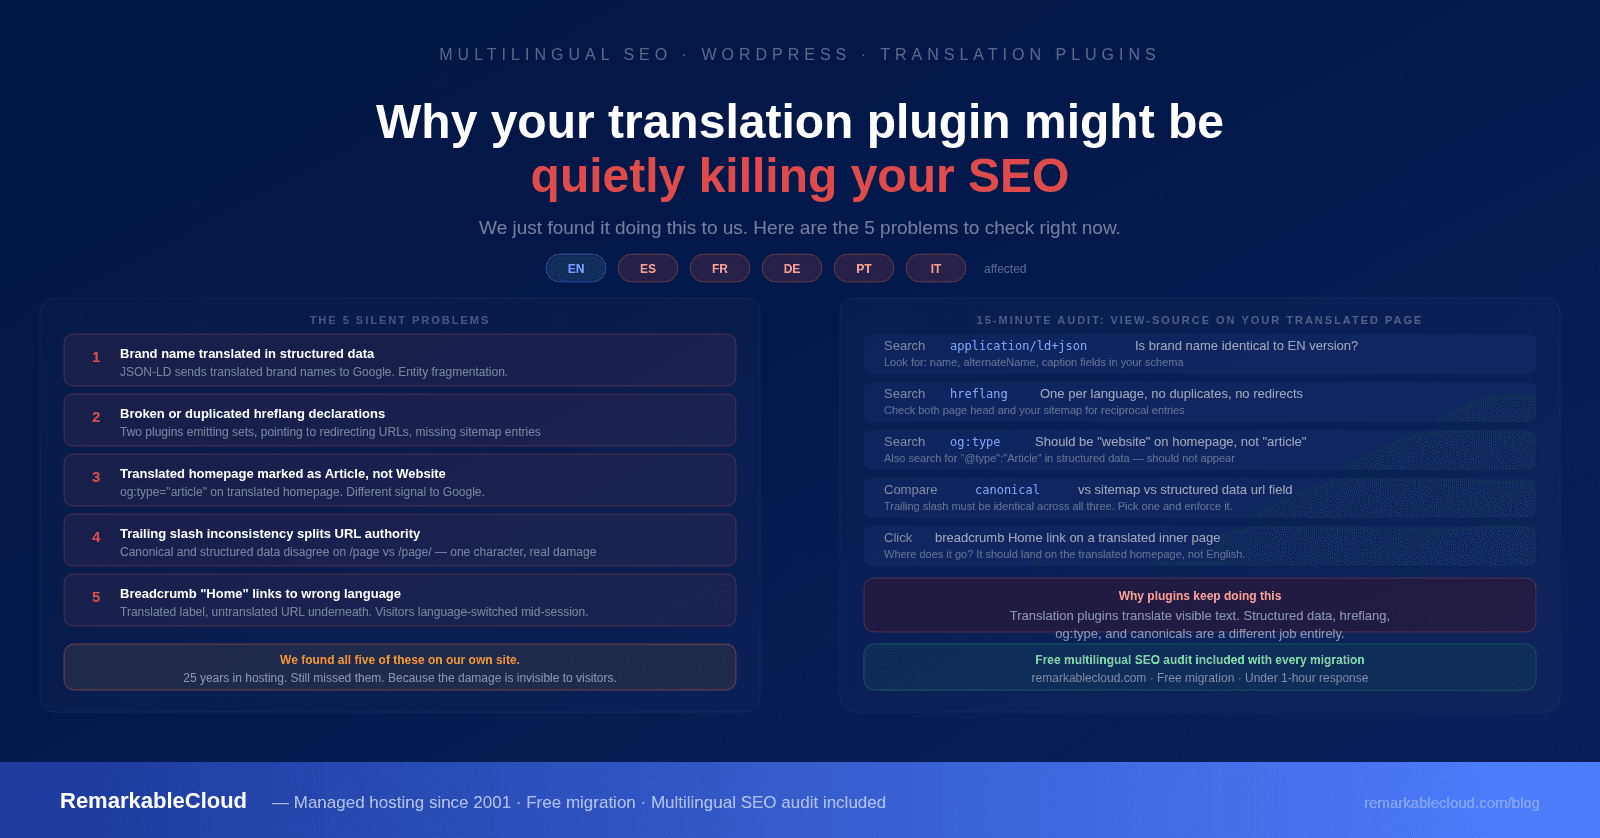
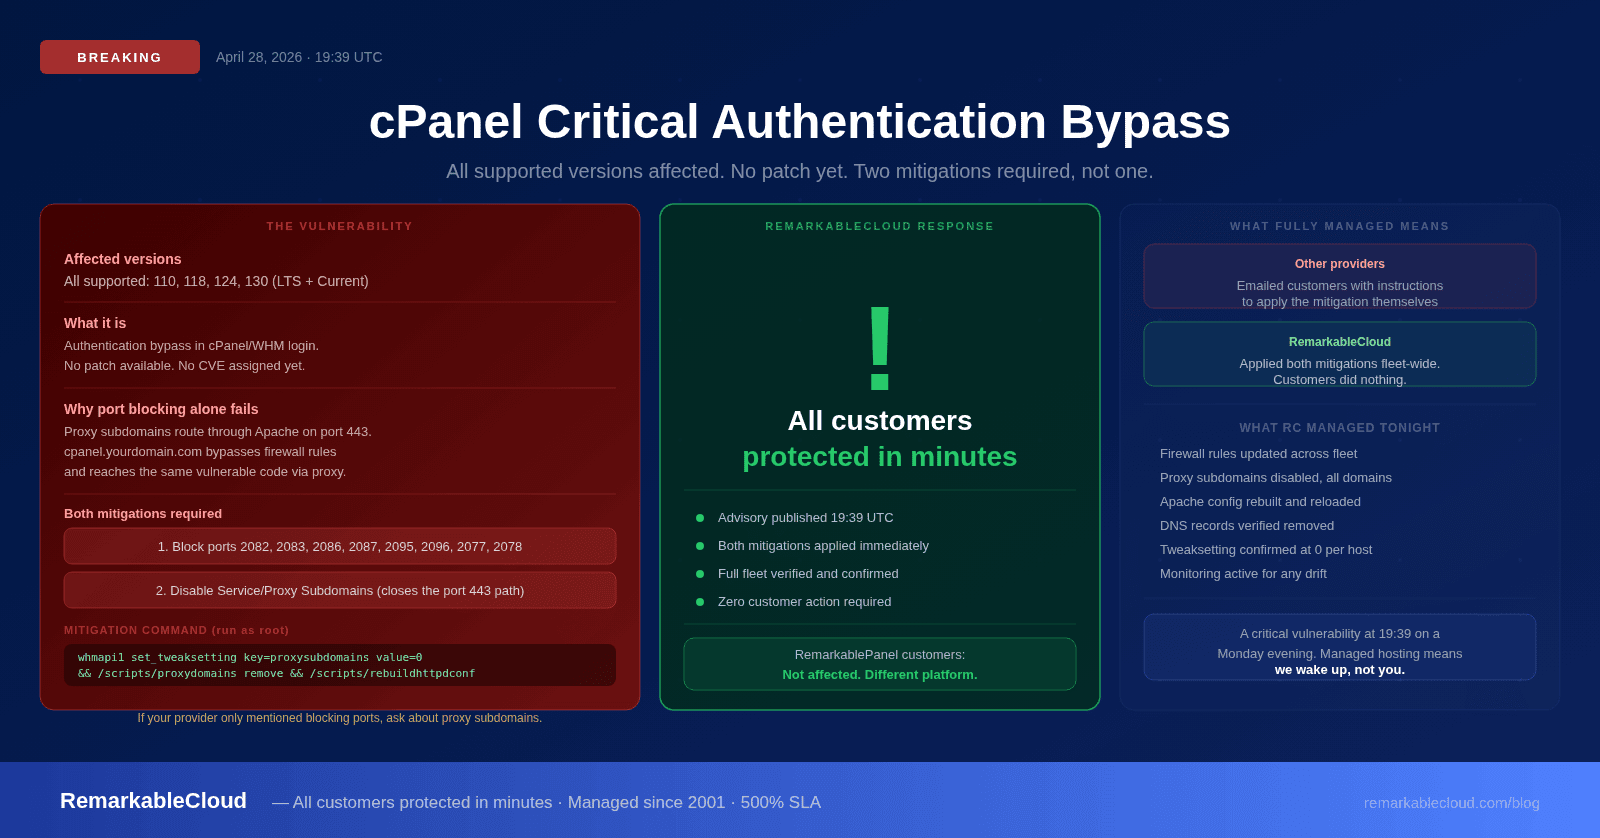
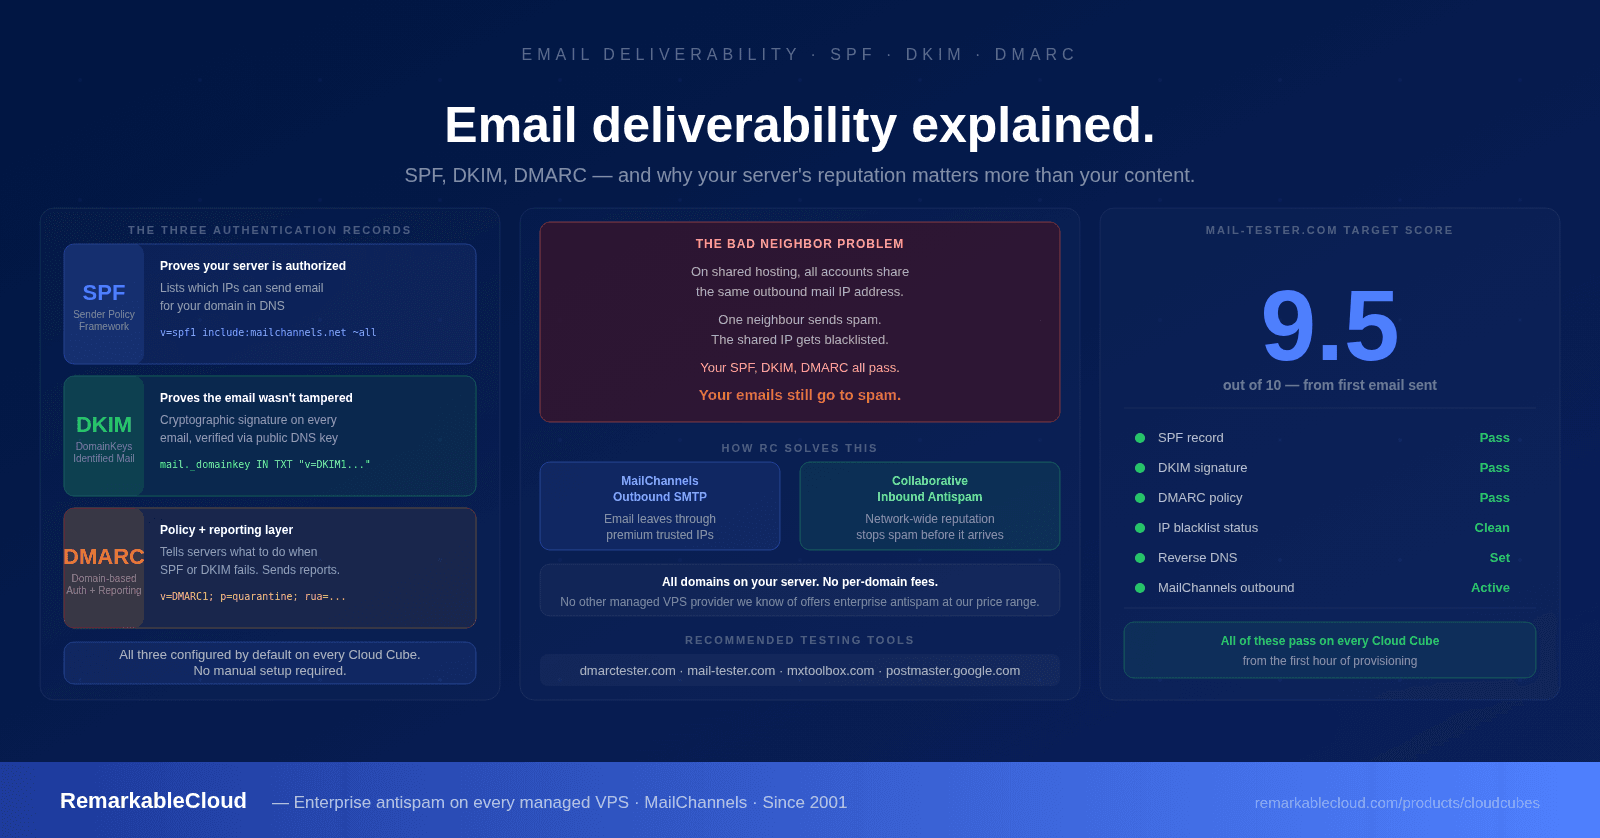
BunnyCDN full page caching for WordPress: complete setup guide

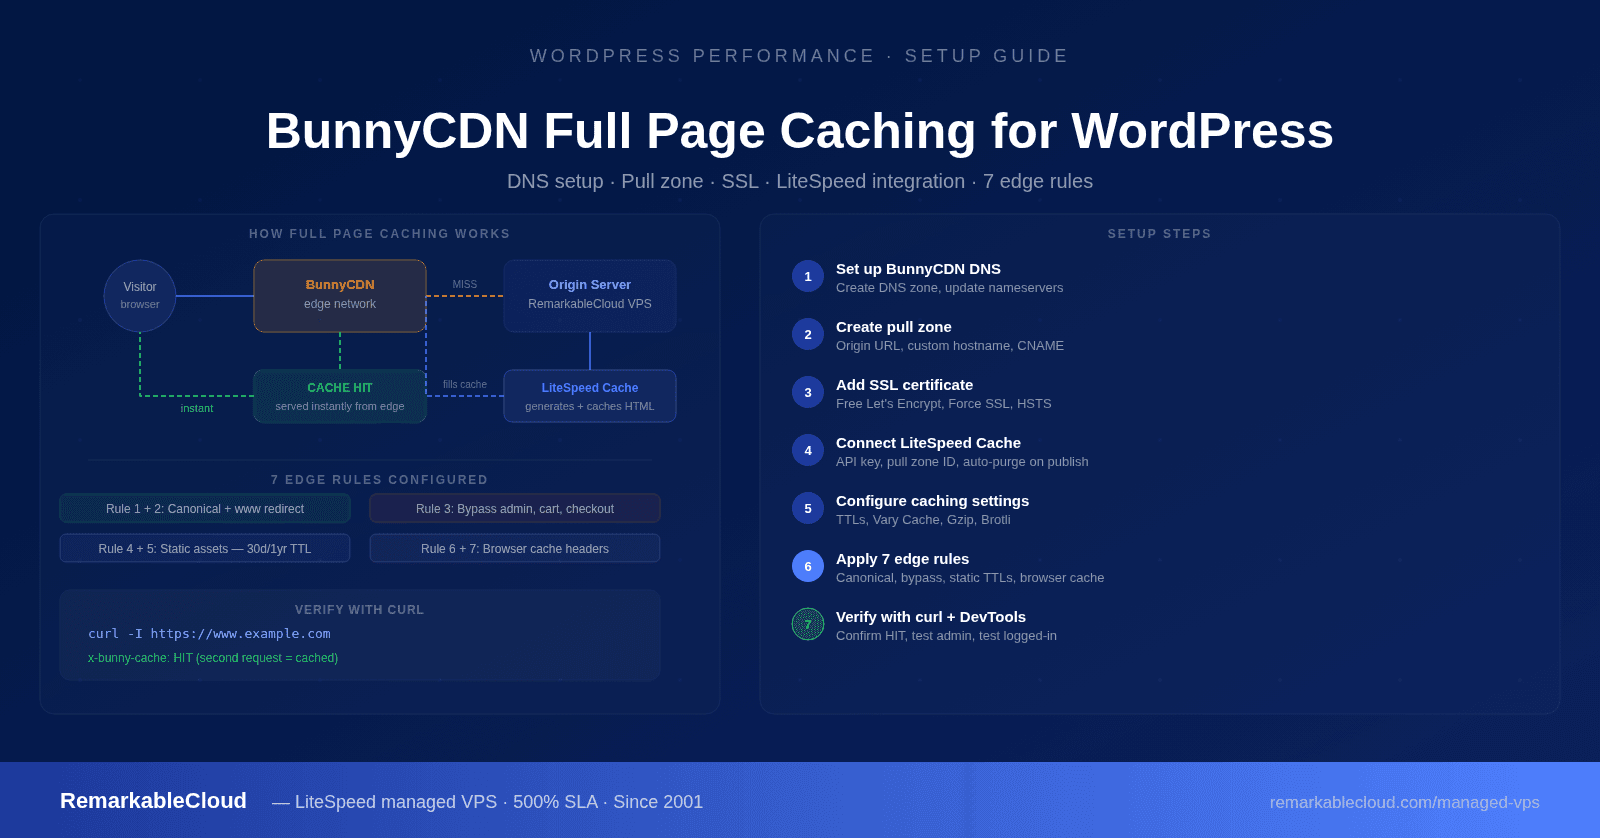
Full HTML caching with BunnyCDN turns your WordPress site into a static-speed machine. Your pages are served directly from BunnyCDN's global edge network, bypassing your origin server on every cached request. The result: dramatically faster load times, lower server load, and a CDN that handles traffic spikes without touching your server.

This guide covers the complete setup: DNS zone, pull zone, SSL, LiteSpeed Cache integration, and the 7 edge rules that make full-page caching work correctly without breaking logins, admin access, or dynamic content.

What you need before starting
  • A BunnyCDN account — free to create at bunny.net
  • Access to your domain registrar (to update nameservers)
  • LiteSpeed Cache plugin installed and active on your WordPress site
  • Your origin server's IP address

Step 1: Set up BunnyCDN DNS

BunnyCDN DNS is a fast anycast DNS network. Using it alongside your pull zone gives you both CDN and DNS performance in one dashboard. This step creates a DNS zone for your domain and updates your registrar to point to BunnyCDN's nameservers.

1
Create a DNS zone
In your BunnyCDN dashboard, go to DNS and click Add DNS Zone. Enter your domain name (e.g., example.com) and confirm. BunnyCDN assigns you two nameservers — note them down.
2
Update your registrar's nameservers
Log into your domain registrar (GoDaddy, Namecheap, Cloudflare, etc.) and replace the current nameservers with the two BunnyDNS servers from step 1. DNS propagation typically takes 30 minutes to a few hours.
3
Add an A record for your origin
Back in the BunnyCDN DNS zone, add an A record pointing to your origin server's IP address. This keeps direct server access working while you configure the CDN.
BunnyCDN DNS Zone creation dashboard

Creating a DNS zone in the BunnyCDN dashboard

BunnyCDN DNS nameservers assigned to domain

BunnyCDN assigns two nameservers — update these at your registrar

Managing DNS records in BunnyCDN

DNS zone with A record and CNAME records configured

Step 2: Create a pull zone

A pull zone is what BunnyCDN uses to fetch and cache your content. You create it once, point it at your origin server, and BunnyCDN handles delivery from edge nodes worldwide.

1
Add a pull zone
In BunnyCDN, go to CDN and click Add Pull Zone. Give it a descriptive name (your site name works). BunnyCDN appends .b-cdn.net automatically.
2
Set origin type and URL
Set Origin Type to Origin URL and enter your site's URL (https://example.com). This is where BunnyCDN fetches content when the cache is cold.
3
Choose Standard Tier
Standard Tier covers most WordPress sites well. It balances global coverage, speed, and cost. High-volume sites or sites requiring specific regions can evaluate the Volume Tier later.
4
Add a custom hostname
In pull zone Settings, under Custom Hostnames, add your domain (e.g., www.example.com). This is what visitors actually see in the URL — not the .b-cdn.net address.
5
Create a CNAME record in BunnyCDN DNS
Back in your DNS zone, add a CNAME record: name www (or your subdomain), value is your pull zone's .b-cdn.net address. This routes your domain's traffic through the CDN.
Adding a pull zone in BunnyCDN

Creating a new pull zone — set origin type to Origin URL

BunnyCDN pull zone setup instructions

Pull zone created — note the .b-cdn.net hostname for your CNAME record

Managing pull zone settings in BunnyCDN

Pull zone management — add your custom hostname here

Step 3: Add SSL certificates

BunnyCDN can auto-generate a free SSL certificate for your custom hostname, or you can upload your own.

1
Generate a free certificate
In your pull zone, go to Security and click on the SSL section. Click Generate Free Certificate. BunnyCDN issues a Let's Encrypt certificate automatically for your custom hostname.
2
Enable Force SSL
Once the certificate is active, enable Force SSL in the same Security panel. This ensures all HTTP traffic redirects to HTTPS at the CDN edge before it ever reaches your server.
3
Enable HSTS (optional)
For added security, enable HSTS (HTTP Strict Transport Security). This instructs browsers to always use HTTPS for your domain. Only enable this after confirming HTTPS is fully working.
SSL certificate settings in BunnyCDN pull zone

SSL settings in the pull zone — generate the free certificate and enable Force SSL

Step 4: Configure LiteSpeed Cache for BunnyCDN

LiteSpeed Cache has native BunnyCDN integration. Connecting the two means LiteSpeed can purge CDN cache automatically when you publish or update content.

1
Get your BunnyCDN API key and pull zone ID
In BunnyCDN, go to Account Settings to find your API key. Your pull zone ID is in the pull zone's URL (bunny.net/cdn/pullzone/[ID]).
2
Configure in LiteSpeed Cache
In WordPress, go to LiteSpeed Cache settings, then CDN. Enable CDN, set CDN Type to BunnyCDN, and enter your API key and pull zone ID. LiteSpeed will verify the connection.
3
Set CDN URL
In LiteSpeed Cache CDN settings, set the CDN URL to your custom BunnyCDN hostname (e.g., https://www.example.com or your CDN subdomain). Static assets — images, CSS, JS — will be served from the CDN URL.

Step 5: Fine-tune caching settings

Before adding edge rules, get the basic caching configuration right in BunnyCDN's pull zone settings.

  • Browser Cache TTL: Set to 30 days (2592000 seconds) for static assets. Browsers cache these locally and avoid re-requesting them on return visits.
  • Origin Cache TTL: Set to 1 day (86400 seconds) for HTML pages. This is overridden per-path by your edge rules.
  • Vary Cache: Enable Vary Cache by Cookie if your site serves different content to logged-in users. This prevents cached logged-in pages being served to guests.
  • Ignore Query Strings: Disable this — WordPress uses query strings for cache-busting (e.g., ?ver=6.4). Ignoring them would serve stale CSS and JS.
  • Enable Gzip/Brotli: Enable both. BunnyCDN compresses responses at the edge before delivery, reducing transfer size 60-80% for text content.
BunnyCDN caching configuration settings

Pull zone caching settings — TTL, Vary Cache, and compression options

Step 6: The 7 edge rules for full-page caching

Edge rules are where full-page HTML caching is actually configured. These 7 rules work together: rules 1 and 2 enforce canonical URLs, rule 3 bypasses cache for sensitive paths, rules 4 and 5 set long TTLs on static assets, and rules 6 and 7 control browser-side caching. Apply them in this order.

BunnyCDN edge rules configuration

Edge rules panel in BunnyCDN — add each rule in order

BunnyCDN edge rule conditions and actions

Configuring conditions and actions for an individual edge rule

HTML Caching
Rule 1: Set Canonical Header (enforce HTTPS + www)

Ensures every page is served with a consistent canonical URL, preventing duplicate content issues at the CDN level.

Condition: Hostname does not match www.example.com
Action: Redirect URL to https://www.example.com{Path}{QueryString} with 301 status

Replace example.com with your actual domain throughout all edge rules.
HTML Caching
Rule 2: Set www Redirect (streamline URL structure)

Redirects non-www traffic to www at the edge, before it reaches your origin server. Consistent with Rule 1 but catches additional URL variations.

Condition: Request URL matches ^http://example.com/ (regex)
Action: Redirect URL to https://www.example.com{Path}{QueryString} with 301 status

Bypass Cache
Rule 3: Disable Caching for sensitive areas

Bypasses CDN cache for WordPress admin, login, checkout, cart, and any paths that must never serve cached responses. This is the most important rule — get it wrong and logged-in admin sessions serve cached pages.

Condition: Any of the following URL paths match:

/wp-admin/* /wp-login.php /cart/* /checkout/* /my-account/* /wp-cron.php /xmlrpc.php

Action: Override Cache Time = 0 (do not cache)

Add any other paths that are user-specific or session-dependent. WooCommerce sites should also add /store/* and any cart/wishlist plugin paths.
Static Assets
Rule 4: CSS and JS server cache (long TTL)

Sets a long server-side cache TTL for CSS and JavaScript files. These change infrequently and should be cached aggressively at the edge.

Condition: Extension matches css OR js
Action: Override Cache Time = 2592000 (30 days in seconds)

Static Assets
Rule 5: Images, videos, and fonts server cache

Sets an even longer server-side cache TTL for media files. Images and fonts rarely change and benefit from extended edge caching.

Condition: Extension matches jpg OR jpeg OR png OR gif OR webp OR svg OR woff OR woff2 OR mp4
Action: Override Cache Time = 31536000 (1 year in seconds)

Browser Cache
Rule 6: CSS and JS browser cache headers

Sets Cache-Control headers that instruct browsers to cache CSS and JS locally. Visitors who return to your site skip re-downloading these files on every page load.

Condition: Extension matches css OR js
Action: Set Response Header = Cache-Control: public, max-age=2592000, immutable

Browser Cache
Rule 7: Override browser cache for static files

Applies consistent browser caching headers to all static asset types, ensuring images, fonts, and media files are cached by the browser across sessions.

Condition: Extension matches jpg OR jpeg OR png OR gif OR webp OR svg OR woff OR woff2
Action: Set Response Header = Cache-Control: public, max-age=31536000, immutable

Step 7: Verify the setup

Once all rules are saved, test the cache before calling it done.

Test with curl

The fastest way to confirm BunnyCDN is serving cached responses is to check the response headers. Look for x-bunny-cache: HIT on repeated requests:

curl -I https://www.example.com

On the first request you'll see x-bunny-cache: MISS (fetching from origin). On the second request to the same URL you should see x-bunny-cache: HIT (served from edge). If you're still seeing MISS after multiple requests, check Rule 3 isn't over-matching your paths.

Test with your browser

Open DevTools (F12), go to the Network tab, and reload your homepage. Check the response headers on the HTML document request. Look for the x-bunny-cache header and confirm the CDN URL is serving your assets (images, CSS, JS should show your CDN hostname in the initiator).

Test admin access

Log into WordPress admin and confirm the dashboard loads correctly. If Rule 3 is configured properly, /wp-admin/* should bypass cache entirely and you should see a fresh, functional admin interface. If you see a stale page or get logged out, revisit Rule 3's path matching.

Test a logged-in page view

Log in as a regular user and browse the front end. The toolbar should appear. If a cached page is served to a logged-in user without the toolbar, your Vary Cache by Cookie setting is not active or your login cookie name is not correctly configured.

Running this on a RemarkableCloud managed VPS means LiteSpeed is pre-configured and BunnyCDN cache purges on publish automatically. The server side handles itself.

See what's included →

A fast WordPress site starts with a fast, managed server

RemarkableCloud's managed VPS includes LiteSpeed, proactive monitoring, daily backups, and a free mail gateway on every plan. BunnyCDN handles the edge; we handle everything underneath. From $2 your first month.

See managed VPS plans
No contracts · Free migration · 500% SLA

FAQ

Does full-page caching with BunnyCDN work with WooCommerce?
Yes, with careful edge rule configuration. Rule 3 must bypass cache for /cart/*, /checkout/*, and /my-account/* at minimum. WooCommerce also sets cookies (woocommerce_cart_hash, wp_woocommerce_session) that indicate a non-empty cart — configure Vary Cache by Cookie to serve uncached responses to users with these cookies active. Test the checkout flow thoroughly after setup.
What is the difference between BunnyCDN's pull zone and a reverse proxy?
A pull zone fetches content from your origin and caches it at BunnyCDN's edge. Visitors request content from the nearest edge node, not your server. A reverse proxy passes all requests through to your origin (with optional caching). BunnyCDN's pull zone is a CDN architecture — it's most effective for content that can be cached, like static assets and full HTML pages. Dynamic, user-specific content bypasses the cache via your edge rules.
How do I clear the BunnyCDN cache after publishing new content?
If you've connected LiteSpeed Cache to BunnyCDN using your API key and pull zone ID, cache purges happen automatically when you publish or update content. For manual purges, go to your pull zone in BunnyCDN dashboard and click Purge Cache. You can purge by URL (single page) or purge the entire zone. Purging the full zone is fast but use it sparingly on high-traffic sites — a full purge means your origin serves all requests while the edge refills.
Why is my cache showing MISS on every request?
Persistent cache MISS usually means one of three things: Rule 3 is matching too broadly and bypassing cache for all paths, your origin is sending Cache-Control: no-cache or no-store headers (BunnyCDN respects these), or cookies are triggering Vary Cache and each request is treated as unique. Check your origin's Cache-Control response headers with curl -I and look for headers that prevent caching. LiteSpeed Cache's CDN settings should be configured to send cacheable headers for front-end pages.
Does BunnyCDN work with LiteSpeed Cache's built-in CDN feature?
Yes. LiteSpeed Cache has a dedicated BunnyCDN integration under its CDN settings. Enter your BunnyCDN API key and pull zone ID and LiteSpeed Cache handles automatic purging on publish, update, or manual cache clear. This is the recommended way to integrate the two on a LiteSpeed-powered server — it gives you server-level caching plus CDN edge caching working together.

Table of Contents

cPanel Shared Hosting to VPS
Articles
Remarkable-Guille
Migrate cPanel shared hosting managed VPS

Most cPanel migrations feel more complicated than they are. Your existing hosting stays live throughout. Your files, database, email, DNS, and SSL all move to the new server before you change a single DNS record. You test everything on a staging URL first. Then you update DNS, propagation takes minutes to a few hours, and your site is live on dedicated infrastructure with no forced downtime window. This guide walks through all 7 steps: what RemarkableCloud handles, what you do, what to verify before flipping DNS, and what changes on the other side.

Read More »
managed VPS hosting comparison
Articles
Remarkable-Guille
Nobody in our price range offers what we do. We said it

Most providers use “managed” to mean they handle the hardware layer. Ask them for help with an email deliverability issue or a PHP configuration problem and they draw the line: “That’s your application.” We don’t operate that way. We include a 500% SLA from minute one, three independent backup layers, free inbound and outbound antispam for every domain on your server, a managed firewall with active IDS, and 24/7 human support that helps beyond the server layer. All of it at $8/month. This is an honest feature-by-feature comparison. Check us against anyone in our price range.

Read More »
shared hosting slowing down
Articles
Remarkable-Guille
Is shared hosting slowing down? The data tells an interesting story.

I’m not saying shared hosting is dead. I’m saying it’s losing customers from two directions simultaneously: the valuable ones moving up to VPS, and the simplicity-seekers moving out to Wix and Shopify. The CloudLinux Web Hosting Trends Report 2026 — primary research from 446 hosting providers — confirms what I’ve been seeing in our own customer base for two years. 26% of providers name VPS as their biggest growth opportunity. 41% are losing customers to SaaS platforms. cPanel’s mindshare dropped 40% in 15 months. And AI is about to change the managed hosting equation in ways our industry hasn’t fully reckoned with yet.

Read More »
Shared Hosting
Articles
Remarkable-Guille
7 Signs You’ve Outgrown Shared Hosting and What to Do Next

Shared hosting is the right starting point — until it isn’t. Consistent slowdowns, site crashes during traffic spikes, transactional emails landing in spam, and resource limit warnings are all signs that the shared environment has become a ceiling for your business. This guide covers the 7 specific signs that your site has outgrown shared hosting, explains what actually changes when you move to a managed VPS, and walks through what a migration looks like when the server is fully managed for you.

Read More »
Facebook
Twitter
LinkedIn