Introduction #
In this article, we are going to learn how to customize the Email Reseller
Url & Host Configuration #
The Email Reseller Service uses white-label host and server names, but you can customize the URL of the webmail service and hostnames, if you want to customize your URL and Hostnames, please start with the CrossBox customization guide before continuing.
Creating Email Hosting Plans #
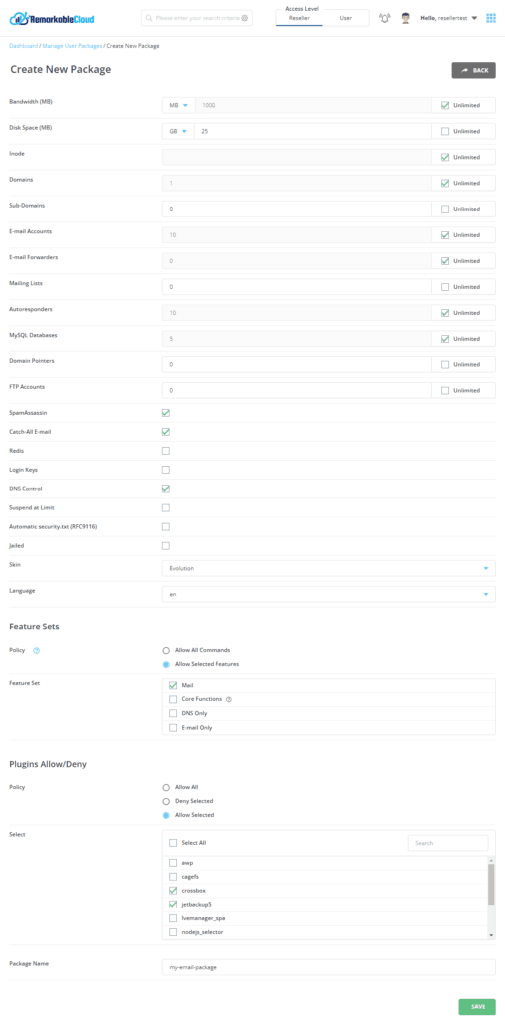
To create your email hosting packages, follow these simple steps:
- Login to your Email Reseller panel.
- Click on “Manage User Packages”.
- Click on “Add Package”.
- Bandwidth: The amount of bandwidth we recommend Unlimited
- Disk Space (MB): Disk space for the whole user account in MB/GB or TB
- Domains: The number of supported domains or Unlimited
- Sub-Domains: Set to 0 (if the customer needs email for a subdomain, add the subdomain as a new domain)
- E-mail Accounts: The number of supported email accounts or unlimited (please note that the system always creates a default email, so if you want the customer to have 5 email accounts, set 6 here)
- E-mail Forwarders: The number of supported email forwards or unlimited
- Mailing Lists: Not supported, set to 0
- Autoresponders: The number of supported autoresponders or Unlimited
- MySQL Databases: Crossbox requires several databases; set this to unlimited.
- Domain Pointers: No Supported – Set to 0
- FTP Accounts: No supported – set to 0
- SpamAssassin: Activates the antispam settings, we recommend to activate this
- Catch-All E-mail: Activates the catch-all email, a special email account that receives all emails destinated to non-existing email accounts
- Redis: Unsupported – Uncheck
- Login Keys: Unsupported – Uncheck
- DNS Control: Show the DNS records that the user must replicate in his/her DNS/Hosting provider
- Suspend at Limit: We recommend to uncheck
- Automatic security.txt: Unsupported – Uncheck
- Jailed: Unsupported – Uncheck
- Skin: Evolution
- Language: Chose the language of your choice
- Feature Sets Policy: Allow Selected Features (IMPORTANT)
- Feature Sets Policy: Mail (IMPORTANT)
- Plugins Allow/Deny Policy: Allow Selected
- Plugins Allow/Deny Select: crossbox, jetbackup
- Package Name: The name of your package
Click Save to create your new email package. You can create as many package as you need.
Modifying the user control panel #
The user control panel is ready; you only need to customize the CrossBox URL.
- From your Email Reseller control panel click on “Customize Evolution Skin”.
- Click on “Menu”.
- In the “Communication Suite Section” change the CrossBox hostname on each icon from office.remarkablemail.com to office.protectedserver.net if you want to use our white-label host or your own host you create in the “Url & Host Configuration”section.
- Do not change anything else, and click on “Save Changes”

